Double Header

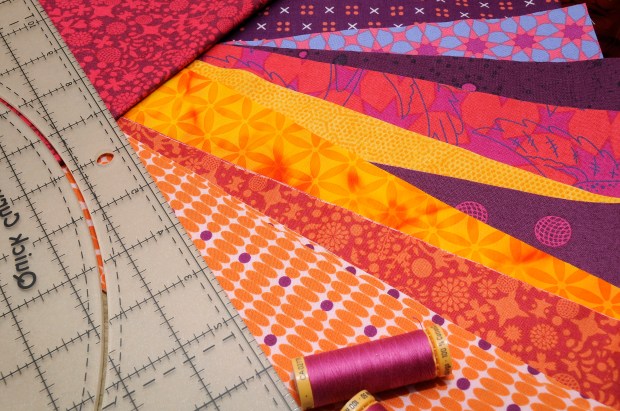
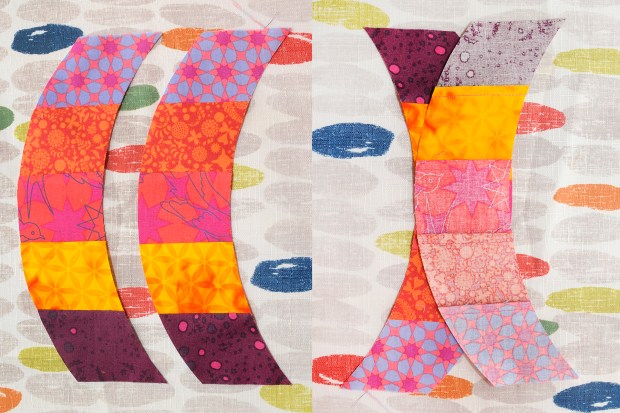
So many babies lately! I had two baby quilts I needed to have completed for the beginning of the New Year and thankfully I got both done in time to welcome the babies home. In order to save time I used the same design for both, allowing me to use pieces to mix and match between the two quilts. I chose a simple star pattern that consisted of large squares and triangles and quickly got under way.

Quilt for Baby Ellie

Baby quilts are great for getting to use fun colours and patterns.

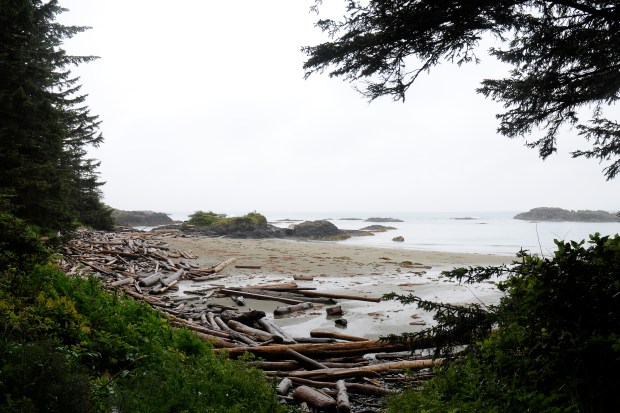
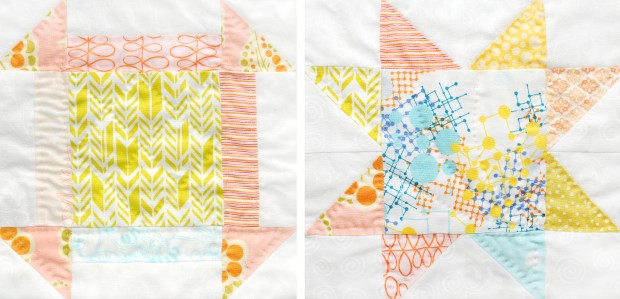
This first quilt I made for a good friend of mine but I had no idea if the baby was going to be a boy or a girl. They live on the west coast so I deemed an ocean theme appropriate, plus that meant cute ocean creatures! I also had a huge amount of blue and white wave patterned fabric from a previous project that I never used so getting rid of fabric from the stash is a super bonus.

Baby Quilt for Ellie

I decided to be a bit playful and turn one of the squares in the middle so that it didn’t line up with the others and once I had tried it I just couldn’t go back!

After completing the piecing for the top I hand stitched straight lines throughout, using the geometric shapes as my guide. I’m always looking for ideas for stitch patterns that will save me time on stencilling a design out. Plus this means I don’t have any pencil lines at the end that never seem to want to wash or erase completely out. I love how this came out but didn’t realize how the lines would affect the pattern on the fabric, making it move more into the background. Every time I do a quilt I learn something new!

Quilt for Baby Ellie

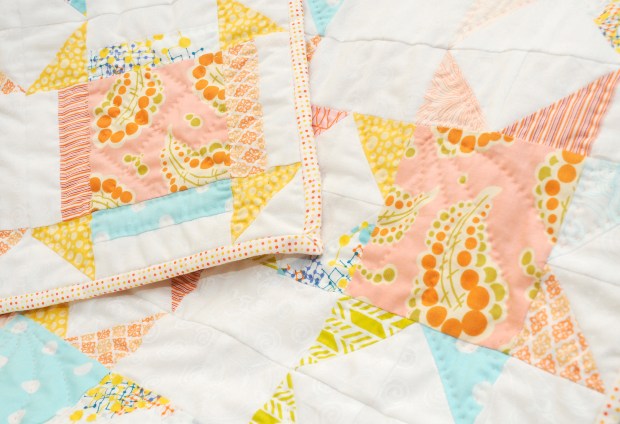
Ocean creatures in the corners added an extra surprise to this quilt.

I decided to add a fun little artistic element to the corners and drew, then stitched, little ocean creatures onto the white squares. It may be a little hard to see but each corner had it’s own little image – whale, starfish, crab, and jellyfish. Happily this seemed to jump out at people right away when they saw the quilt and I really enjoyed trying my hand at freehand drawn stitching.

Quilt for Baby Leighton

A bright addition to a dreary March day.

The second quilt was for my brother and sister-in-law’s new baby and this time I knew it was going to be a girl. Using some of the same cut out pieces from the first quilt, again I was able to dip into my stash to pick out some different patterns and colours for the top piece to make something specific and unique to the new baby. Because I made the second quilt a bit smaller I had to bulk it up with borders to increase the size and really like how the star gets framed.

Baby Quilt for Leighton

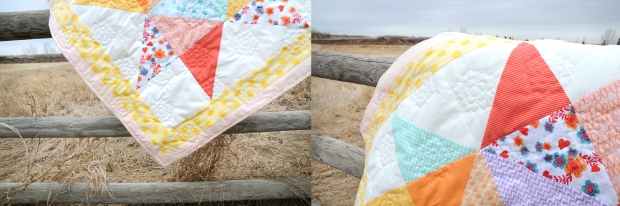
This time I used flannel for the backing to make it soft but I would say it was a bit of a struggle to hand stitch. I stencilled in pencil some small flowers all over the back so stitched with my 14” hoop from the back. Maybe it was not the best idea to do it from the back or maybe it was because of the two different types of fabric but I felt like it was hard to get the front to stay nice and tight in the hoop, while the back seemed fine. I also struggled a bit with the flower pattern as I think it was a bit small for this project and I spaced them too far apart. For hand stitching I use a wool batting and it is recommended that the spacing between stitches should not be more than 3” or 4”. I did think about adding some stars to fill in the gaps but when getting others’ opinions it seemed they thought just having the flowers was fine. I could have also added some ties in between to fill in the space which would have added a nice texture and dimension to the quilt. Time will tell how this quilt wears.

I really like how these two quilts have their own individual and separate feel even though they were made at the same time, with some of the same fabrics, and using the same large star pattern in the middle.

Advertisement

Learning Curve

The other day I got an email from the quilt shop and decided at the last minute to take another class that was being run on the weekend. Titled “Metro Hoops/Metro Rings”, I thought it would be a great opportunity to finally learn how to sew a curved edge!

Prior to the class you had to choose which pattern you were going to make and with six of us attending we all coincidentally decided to do metro rings. We also had to buy a specific ruler that went with the pattern, a bit pricey, but worked great for these patterns (to be fair the ruler comes with an included pattern). The Quick Curve Ruler and Metro Ring pattern comes from Sew Kind of Wonderful, a company from the States started by three sisters (see http://www.sewkindofwonderful.com for more information).

Metro Rings Class Preparation2.jpg

Quick Curve Ruler and Metro Rings Class Fabric Prep.

Both patterns require 2 1/2” strips and I had planned on using scraps from my stash to learn how to create the block. Because I wasn’t sure how this pattern would work I did end up buying some new fabric but as I worked on the block throughout the day I really believe that this would be a great way to use up some scraps. All you need are strips of fabric at the minimum of about 7” – 10” in length, depending on how you want to develop the pattern for your project. The height of the ruler is 7” but you will need to include room to square up before you can make your first curved set. That first bit of waste is about 2 1/2”, leaving you room to make the 2 1/2” curve set. Having strips at about 10″ will let you make two sets but if you were doing a larger project and wanted to save waste you would use longer pieces to make multiple sets. The pattern suggests 20” strips which should give you about 7 identical strip sets. The longer the strips the less waste you have but more sets of identical strips.

Sewing the curve turned out to be pretty easy! Don’t be daunted by the awkwardness of how it sits while you are sewing and just focus on the fabric in front of the foot, making sure that just that bit lines up. Like magic it just ends up working out! My teacher suggested sewing the curved edge with the two sides of the fabric together and oriented so that the fabric on top makes a “C” shape.

metro-rings-sewing-a-curve3

Put the two pieces together so that the top piece forms a “C” shape. You wouldn’t sew these two pieces together but this is a good example of the shape I am trying to describe.

We learned about overlapping the edge to start, meaning that you want to leave about a quarter of an inch of overlap on the top fabric to account for starting the stitch on both fabrics at once. We did not use any pins but just manipulated the fabric by hand as it went through the foot. So easy and I got a great smooth curve every time.

metro-rings-sewing-a-curve2

Overlap the edge on top at the same width that you are sewing your seam (1/4″). You would begin sewing at the spot on the left where the two pieces meet. I didn’t line them up exactly so that you could see how the bottom was sitting compared to the top but normally you would match the curved edges of the two pieces together.

It was really interesting to see how other people in the class were using their fabrics and I thought all of the different blocks were so interesting. This is a really versatile block and I think that mixing and matching from scraps and different fabrics would make a really exciting quilt every time.

metro-rings-class2

Finishing up the first block in class with a second on the go behind.

metro-rings-class4

Block samples from my classmates and I with finished samples of the metro rings and metro hoop pattern on either side.

As I already have a lot of quilt projects on the go, originally I was going to make a table runner by using three of the blocks. I ended up only making two as I couldn’t decide if I wanted to make these into pillows instead or maybe some place mats. The problem is that the blocks are so beautiful that I don’t want them getting dirty with messy eaters! Time will tell what I decide to do but for now I am going to let them sit until I get some other projects finished.

metro-rings-final-squares

Two finished 4-block units placed side by side.

I have another class coming up in April through SNAP where I will learn a Japanese dyeing technique called Arimatsu Shibori. I can’t wait to try my hand at dyeing fabric for a quilt!

What Lies Beneath

tofino-landscape-1

Tofino, British Columbia

A few years ago I took a road trip with the final destination being Tofino, BC. Tofino is a beautiful small surf town on the west coast of Vancouver Island surrounded by ocean and rainforest. While in one of the shops I bought some little round shell buttons and decided that I wanted to incorporate them into a quilt that commemorated the trip and the landscape.

Apart from hanging out around town, we also surfed, hiked, and tried our hand at paddle boarding. Paddle boarding is an amazing experience; to float on the surface and look down into the water and see little fish, coral, urchins, and starfish was definitely an inspiration for this quilt. I also wanted to incorporate the landscape. It rained quite a bit when I was there and you would get these huge expanses of grey sky and grey ocean, which intensified the surprise pops of colour found under the water.

tofino-landscape-2

A grey day in Tofino.

ucluelet-undersea-photos

West coast marine life.

Originally I had planned to make a full sized quilt but I have quite a collection around here now so decided to do a wall hanging instead (33″ x 38″). My plan was to sew the fabrics I’d picked into a geometric pattern with no real tangible link to the real world. Something about that idea wasn’t grabbing me though and I was having trouble committing to it and begin cutting. It wasn’t until I took some time and rethought about what I was trying to achieve that I began to form a picture of what the quilt would finally become. This happens to me quite a lot and this process can mean that the idea either ruminates in my mind for days or weeks, or in the case of a quilt still to come—years, or result in me sketching out multiple ideas until I am satisfied. Even then a quilt will evolve as I go, as in the case of “A Painting for a Quilt”.

tofino2

Tofino inspired quilt.

In the end I came up with something more recognizable to reality but still abstract enough that I could shape the movement and reflection of the water, and the brilliant colours underneath it, amongst the stillness of a grey day. The design also allowed me to incorporate the shell buttons, giving them a defined sense of place. The buttons embody the ubiquitous nature of sand on the ocean floor and the makings of a beach but also as representations of shelled ocean creatures.

To hang the quilt I used a method similar to what I saw being done at the museum when hanging textiles and used two small loops of fabric sewn to the back top of the quilt a few inches in on either side. I made sure that the loops where big enough for the wooden slat I was using and slid the slat through the loops, screwing the edges of the wood into the wall. I do notice a bit of a difference between the top and the bottom in how it hangs as the top of the quilt is stabilized and lays flat against the wood while the bottom is more free to hang and tapers a bit towards the bottom. I guess if I really wanted to keep everything flat I could have added a slat to the bottom as well. I’m not sure how this will affect the longevity of the quilt over time so I will have to ask a few of my conservator friends their opinion on the matter!

A Study In Twins

My friends announced in February that they were pregnant with twin girls and I knew I had to get going on some quilts if they were to be ready for the babies’ arrival in August. I jumped at the chance to do a little experiment that has been on my mind lately…to play with two different patterns but using the same fabrics in both.

I knew I wanted to use traditional block patterns but with bright contemporary fabric colours and prints so I decided to create one quilt using a churn and dash block and the other with a variable star block pattern.

TwinsQuilt8

Churn and Dash Block, Variable Star Block

Both blocks contain a central square in the middle and triangles that frame the corners, but each retains its own distinct look. For the star block I decided to randomly sew the triangles onto the square without any thought for colour coordinated combinations. Alternatively I decided that to do the same for the churn and dash would make it too chaotic for the eye to follow the underlying pattern. Instead, while I did randomly choose what fabric I was going to use for each individual block, the triangles were always consistently the same, giving me the freedom to make the rectangular frames act as the random element in the block. The white pieces of the quilt came from two different fabrics and they were also constructed without any thought to how they sat next to each other throughout the quilts.

TwinsQuilt14

Two central squares using the same fabric, showcasing how these blocks mirror each other while still staying distinct to their own block patterns.

I really wanted to see how two different patterns using the same fabrics would compare to each other and I found that in many ways the quilts were able to mirror each other as a set but still have a distinct enough difference that the twins were not getting the same quilt.

A surprising element when constructing these quilts manifested itself in the various fabrics I used. I chose a lot of fabrics with the same colour elements in them but without foresight to how they would stand out within the blocks, especially when observed from a distance. Two of my fabrics were very subtle in that the pinks and blues were quite light and delicate and seemed to get lost against the very active nature of the other fabrics. In the image below, note how these fabrics get lost in the overall pattern, specifically where some of the triangles seem to be missing. I quite like this in that it adds movement and action, especially in the variable star pattern – almost as if the stars were twinkling, but this effect was purely accidental. Happy accidents!

TwinsQuilt11

The two quilts side by side.

I am happy with how these turned out and it was a lot of fun to work with fabrics that were playful and bright and with block patterns that I have wanted to try for ages. Hopefully the girls will like them too!

TwinsQuilt36

A Painting for a Quilt

I met Nomi when we both worked as Collections Assistants at the University of Alberta Museums, her in the art collection and me in the ornithology collection, and we quickly became friends. Nomi Stricker is a wonderful artist and we devised an idea in which I would make her a quilt in exchange for one of her paintings. Check her out at www.nomistricker.com!

While she was off for a year travelling Europe I got to work. Inspired by her paintings my vision started at Earthly Goods where I rampaged through the store pulling any and all fabrics that reminded me of her. I chose fabric colours that I had seen her wear or that reminded me of her work and patterns that exemplified her personality or reminded me of what I thought she might be experiencing on her trip. Then the real challenge began. I had an idea in my head but really wanted the quilt to come together organically without any real plan. Inspired by her art I wanted the colours to move the eye but also work together to create a type of organic chaos that as a whole formed a complete and dynamic piece. While I do like things to come together with a bit of chance and I don’t usually strive for symmetry in terms of fabric placement, this was quite an undertaking for me! I found it difficult without any sort of concrete design to let the quilt develop on it’s own while trying to stay true to my original idea.

Nomi uses a lot of colour in her work so she also plays with quiet, neutral areas to harmonize her compositions and I tried to do the same for her quilt leaving a lot of whites and creams around the edge to balance the abundance of colour in the middle. I also gave a lot of thought to how the quilt would lay on the bed with the white borders hanging over the edge, something I don’t usually need to worry about as much on a smaller piece like a baby or lap quilt.

I was pretty uncertain about the whole thing, already coming up with a speech about how if she didn’t like it I could make something else, until I decided on a quilt stitch pattern. Once this was determined I felt like that whole thing came together into something I thought suited her and that she would love. And she does! I presented the quilt to her at her studio about a month ago and to my delight her reaction was everything I had hoped.

NomiQuilt6

Nomi’s Quilt.

All that was left was for me to pick out a piece for the trade to be complete and that turned out to be the most difficult part of the whole process. I just couldn’t decide! I finally picked my top three and she was gracious enough to bring all three to my apartment this week to try the paintings out in the space. It was pretty clear from the outset which was “the one” and I love it. There are many hours of getting to know “Spout” in my future and I can’t wait to see how this painting grows and changes for me.

And so ends the tale of one quilt, one painting, and two happy customers.