

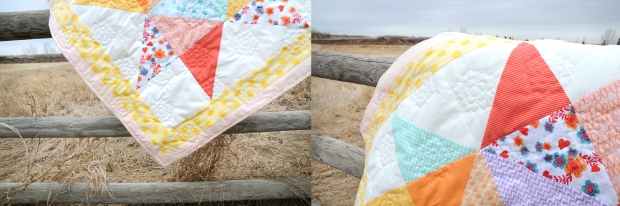
Finally finished this quilt for my new little niece…just over 3 months late but I did it!


Finally finished this quilt for my new little niece…just over 3 months late but I did it!

This weekend I had two quilts displayed in a quilt show, my first one! I was honoured to be asked to submit some of my quilts for the Vermilion Quilters Annual Quilt Show, put on by the Vermilion Quilters Guild this past weekend. It was an amazing event and there were so many beautiful and interesting quilts to check out!

My quilts! “Tofino” and “Snow in Grandmother’s Garden”. Vermilion Quilters Guild Annual Quilt Show.
When we first walked in, we were greeted by two quilters at the door and a corridor full of charity quilts made for organizations such as the Cross Cancer Institute and Quilts of Valour (www.quiltsofvalour.ca). There were also some very impressive door prizes to tempt me!
Then we entered the main hall and I was awestruck by the number of quilts to look at. Of course I wanted to find mine first! 🙂 They were nestled in nicely in the middle beside some beautifully designed and coloured quilts and it was so exciting to see them displayed, having people walking by and stopping to take a look.


Quilt in the foreground: “Aviatrix Medallion” by Carol Wasylik, designed by Elizabeth Hartman and quilted by Extraordinary Extras.

There wasn’t a name attached to the label on this quilt but it is stunning!
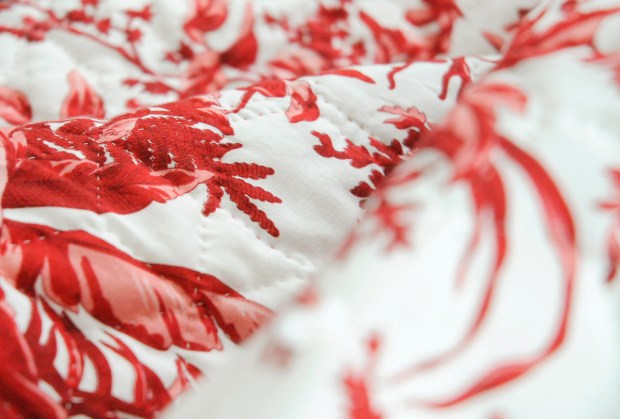
For the viewer’s choice ballot, there were three categories: large quilts, small quilts, and the quilter’s challenge quilts. I ended up choosing a lovely large appliquéd quilt with yoyo flowers (who doesn’t love a yoyo flower?), a small quilt that had been batik dyed, and a challenge quilt where I thought the quilter did a good job of working through a colour palette that they initially were not very excited about.

“Circle of Flowers” by Barb Spurgeon, quilted by Melissa Martens.
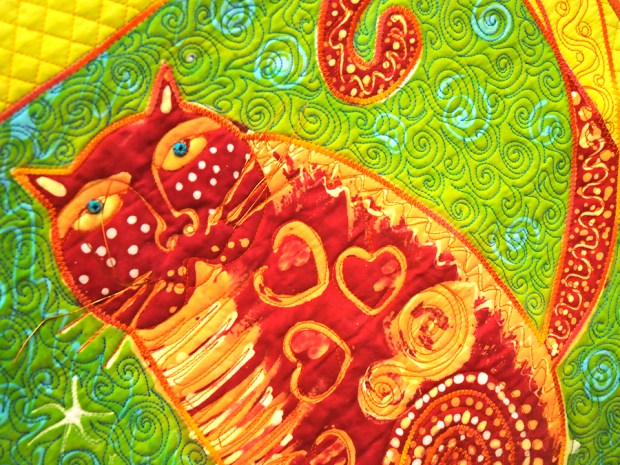
“Cattitude” dyed and quilted by Cindi Plant, pattern image by Laurel Burch.

“Lone Star” by Lyn Yaremchuk, designed by Swirly Girls. Right: Detail of the challenge fabrics that had to be used in the quilt.
As with any art exhibit, I took my time, looking at a quilt close up and then moving back to see it as a whole, as well as making a couple of passes through the show, noticing something new with each pass.
I can really appreciate the massive amount of work it took to organize this event. There was live music and a lunch counter and I was pretty happy that there were tables and chairs set up so I could rest and agonize over who to vote for. It was really great to browse and chat with everyone and there was a palpable sense of community and support that I could see and feel. I am so excited to have had the chance to participate and found it super inspiring to see other quilters’ work, feeling challenged to up my game and try some new designs, especially to use more colour!

Well I have FINALLY finished my latest quilt. This one has been years in the making and it feels so good to have it off my plate. I started this project in the beginning of 2014 and after 3 years of putting it off for other projects, namely wedding and baby quilts (so many babies), and seeing pieces of it strewn around the apartment, I put my foot down and said no more.
Originally I planned for a simple red and white quilt, all in hexagons, using the English Paper Piecing technique. I really love EPP; the idea of slowly building up a quilt by hand and the convenience of having a project that you can take anywhere to work on is exactly what I wanted when I began this quilting venture (the slow-pitch tournament got a lot of questions from some very nice young men).
What I didn’t account for was how long this was going to take me and the challenges that can arise when working on a project over a period of years. What began as a simple hexagonal grandmother’s garden pattern became a lesson in design and took constant consideration. Over time my idea of how the finished quilt was to look changed and eventually I decided that the quilt was a bit boring with just hexagons and wanted to add other elements (plus I wanted this done already). I sketched out many ideas but would quickly change my mind – the design was always in flux. I did eventually, out of necessity more or less due to my self-imposed exile from other projects, decide that I wanted to have strips up one side to make it asymmetrical, taking into account how it would lay on the day bed with only one side falling over the edge. I was also inspired, after doing research on vintage quilts and my great grandmother’s quilt (see History in a Quilt from July 2016), to add a completely different piece of fabric running along the top, chosen from what I had in the stash. As far as I can tell this piece was added to the top edge of the quilt that sees the most wear from hands and face contact while in use on a bed. This portion could be removed for washing or easily replaced once it became too worn. I’m not sure if this had a specific name but would love to know if anyone else has ever come across it!

Snow in Grandmother’s Garden
I am calling this quilt “Snow in Grandmother’s Garden”. It was hand stitched with a starburst pattern on each white hexagon, with stitching around the hexagon edges that make up the red flowers. A lovely tulip pattern is stitched along the top and yarn knots make up the quilting on the asymmetrical edge overhang. The stitching was the hardest part of the entire project for me to figure out and I thought about it constantly from day one. I ended up using these variations of stitching and quilting in order to add interest and align with the piecemeal aspect of the quilt top, but also because in the end this was a quilt for me and I could do whatever I wanted without worrying about it too much.

Detail of the English Paper Piecing and quilt stitching and ties on the front and back.
The back is of a fabric that I found in the quilt shop years ago when I first started this project. I fell in love with it right away and knew I had to have it. I’m pretty sure I bought the whole bolt so this is definitely going to be used in quilts in the future. Yay!
I love the backing fabric on this quilt!
Looking back on this quilt, I am quite proud of how it turned out and I learned a lot in the process, especially that I need to work on keeping my stitches even from front to back! Now that this project is done I can’t wait to try out different shapes and styles…diamonds, apple cores, and clamshells are all in my future.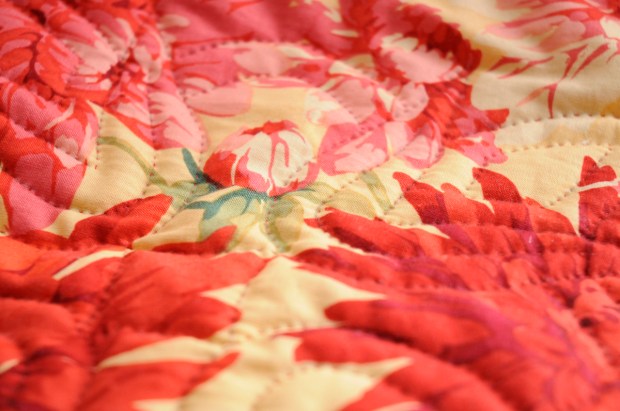

So many babies lately! I had two baby quilts I needed to have completed for the beginning of the New Year and thankfully I got both done in time to welcome the babies home. In order to save time I used the same design for both, allowing me to use pieces to mix and match between the two quilts. I chose a simple star pattern that consisted of large squares and triangles and quickly got under way.

Baby quilts are great for getting to use fun colours and patterns.
This first quilt I made for a good friend of mine but I had no idea if the baby was going to be a boy or a girl. They live on the west coast so I deemed an ocean theme appropriate, plus that meant cute ocean creatures! I also had a huge amount of blue and white wave patterned fabric from a previous project that I never used so getting rid of fabric from the stash is a super bonus.

I decided to be a bit playful and turn one of the squares in the middle so that it didn’t line up with the others and once I had tried it I just couldn’t go back!
After completing the piecing for the top I hand stitched straight lines throughout, using the geometric shapes as my guide. I’m always looking for ideas for stitch patterns that will save me time on stencilling a design out. Plus this means I don’t have any pencil lines at the end that never seem to want to wash or erase completely out. I love how this came out but didn’t realize how the lines would affect the pattern on the fabric, making it move more into the background. Every time I do a quilt I learn something new!

Ocean creatures in the corners added an extra surprise to this quilt.
I decided to add a fun little artistic element to the corners and drew, then stitched, little ocean creatures onto the white squares. It may be a little hard to see but each corner had it’s own little image – whale, starfish, crab, and jellyfish. Happily this seemed to jump out at people right away when they saw the quilt and I really enjoyed trying my hand at freehand drawn stitching.

A bright addition to a dreary March day.
The second quilt was for my brother and sister-in-law’s new baby and this time I knew it was going to be a girl. Using some of the same cut out pieces from the first quilt, again I was able to dip into my stash to pick out some different patterns and colours for the top piece to make something specific and unique to the new baby. Because I made the second quilt a bit smaller I had to bulk it up with borders to increase the size and really like how the star gets framed.
This time I used flannel for the backing to make it soft but I would say it was a bit of a struggle to hand stitch. I stencilled in pencil some small flowers all over the back so stitched with my 14” hoop from the back. Maybe it was not the best idea to do it from the back or maybe it was because of the two different types of fabric but I felt like it was hard to get the front to stay nice and tight in the hoop, while the back seemed fine. I also struggled a bit with the flower pattern as I think it was a bit small for this project and I spaced them too far apart. For hand stitching I use a wool batting and it is recommended that the spacing between stitches should not be more than 3” or 4”. I did think about adding some stars to fill in the gaps but when getting others’ opinions it seemed they thought just having the flowers was fine. I could have also added some ties in between to fill in the space which would have added a nice texture and dimension to the quilt. Time will tell how this quilt wears.
I really like how these two quilts have their own individual and separate feel even though they were made at the same time, with some of the same fabrics, and using the same large star pattern in the middle.


Tofino, British Columbia
A few years ago I took a road trip with the final destination being Tofino, BC. Tofino is a beautiful small surf town on the west coast of Vancouver Island surrounded by ocean and rainforest. While in one of the shops I bought some little round shell buttons and decided that I wanted to incorporate them into a quilt that commemorated the trip and the landscape.
Apart from hanging out around town, we also surfed, hiked, and tried our hand at paddle boarding. Paddle boarding is an amazing experience; to float on the surface and look down into the water and see little fish, coral, urchins, and starfish was definitely an inspiration for this quilt. I also wanted to incorporate the landscape. It rained quite a bit when I was there and you would get these huge expanses of grey sky and grey ocean, which intensified the surprise pops of colour found under the water.

A grey day in Tofino.

West coast marine life.
Originally I had planned to make a full sized quilt but I have quite a collection around here now so decided to do a wall hanging instead (33″ x 38″). My plan was to sew the fabrics I’d picked into a geometric pattern with no real tangible link to the real world. Something about that idea wasn’t grabbing me though and I was having trouble committing to it and begin cutting. It wasn’t until I took some time and rethought about what I was trying to achieve that I began to form a picture of what the quilt would finally become. This happens to me quite a lot and this process can mean that the idea either ruminates in my mind for days or weeks, or in the case of a quilt still to come—years, or result in me sketching out multiple ideas until I am satisfied. Even then a quilt will evolve as I go, as in the case of “A Painting for a Quilt”.

Tofino inspired quilt.
In the end I came up with something more recognizable to reality but still abstract enough that I could shape the movement and reflection of the water, and the brilliant colours underneath it, amongst the stillness of a grey day. The design also allowed me to incorporate the shell buttons, giving them a defined sense of place. The buttons embody the ubiquitous nature of sand on the ocean floor and the makings of a beach but also as representations of shelled ocean creatures.
To hang the quilt I used a method similar to what I saw being done at the museum when hanging textiles and used two small loops of fabric sewn to the back top of the quilt a few inches in on either side. I made sure that the loops where big enough for the wooden slat I was using and slid the slat through the loops, screwing the edges of the wood into the wall. I do notice a bit of a difference between the top and the bottom in how it hangs as the top of the quilt is stabilized and lays flat against the wood while the bottom is more free to hang and tapers a bit towards the bottom. I guess if I really wanted to keep everything flat I could have added a slat to the bottom as well. I’m not sure how this will affect the longevity of the quilt over time so I will have to ask a few of my conservator friends their opinion on the matter!

My friends announced in February that they were pregnant with twin girls and I knew I had to get going on some quilts if they were to be ready for the babies’ arrival in August. I jumped at the chance to do a little experiment that has been on my mind lately…to play with two different patterns but using the same fabrics in both.
I knew I wanted to use traditional block patterns but with bright contemporary fabric colours and prints so I decided to create one quilt using a churn and dash block and the other with a variable star block pattern.
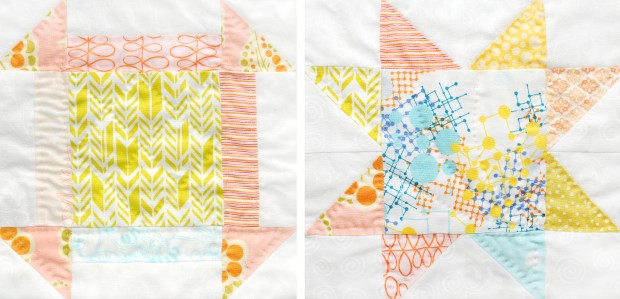
Churn and Dash Block, Variable Star Block
Both blocks contain a central square in the middle and triangles that frame the corners, but each retains its own distinct look. For the star block I decided to randomly sew the triangles onto the square without any thought for colour coordinated combinations. Alternatively I decided that to do the same for the churn and dash would make it too chaotic for the eye to follow the underlying pattern. Instead, while I did randomly choose what fabric I was going to use for each individual block, the triangles were always consistently the same, giving me the freedom to make the rectangular frames act as the random element in the block. The white pieces of the quilt came from two different fabrics and they were also constructed without any thought to how they sat next to each other throughout the quilts.
Two central squares using the same fabric, showcasing how these blocks mirror each other while still staying distinct to their own block patterns.
I really wanted to see how two different patterns using the same fabrics would compare to each other and I found that in many ways the quilts were able to mirror each other as a set but still have a distinct enough difference that the twins were not getting the same quilt.
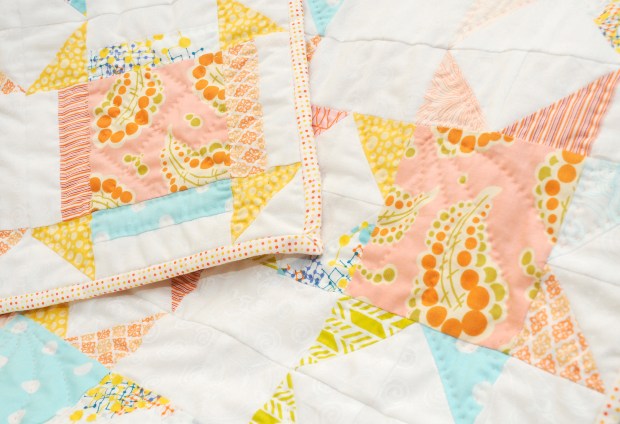
A surprising element when constructing these quilts manifested itself in the various fabrics I used. I chose a lot of fabrics with the same colour elements in them but without foresight to how they would stand out within the blocks, especially when observed from a distance. Two of my fabrics were very subtle in that the pinks and blues were quite light and delicate and seemed to get lost against the very active nature of the other fabrics. In the image below, note how these fabrics get lost in the overall pattern, specifically where some of the triangles seem to be missing. I quite like this in that it adds movement and action, especially in the variable star pattern – almost as if the stars were twinkling, but this effect was purely accidental. Happy accidents!

The two quilts side by side.
I am happy with how these turned out and it was a lot of fun to work with fabrics that were playful and bright and with block patterns that I have wanted to try for ages. Hopefully the girls will like them too!


I met Nomi when we both worked as Collections Assistants at the University of Alberta Museums, her in the art collection and me in the ornithology collection, and we quickly became friends. Nomi Stricker is a wonderful artist and we devised an idea in which I would make her a quilt in exchange for one of her paintings. Check her out at www.nomistricker.com!
While she was off for a year travelling Europe I got to work. Inspired by her paintings my vision started at Earthly Goods where I rampaged through the store pulling any and all fabrics that reminded me of her. I chose fabric colours that I had seen her wear or that reminded me of her work and patterns that exemplified her personality or reminded me of what I thought she might be experiencing on her trip. Then the real challenge began. I had an idea in my head but really wanted the quilt to come together organically without any real plan. Inspired by her art I wanted the colours to move the eye but also work together to create a type of organic chaos that as a whole formed a complete and dynamic piece. While I do like things to come together with a bit of chance and I don’t usually strive for symmetry in terms of fabric placement, this was quite an undertaking for me! I found it difficult without any sort of concrete design to let the quilt develop on it’s own while trying to stay true to my original idea.
Nomi uses a lot of colour in her work so she also plays with quiet, neutral areas to harmonize her compositions and I tried to do the same for her quilt leaving a lot of whites and creams around the edge to balance the abundance of colour in the middle. I also gave a lot of thought to how the quilt would lay on the bed with the white borders hanging over the edge, something I don’t usually need to worry about as much on a smaller piece like a baby or lap quilt.
I was pretty uncertain about the whole thing, already coming up with a speech about how if she didn’t like it I could make something else, until I decided on a quilt stitch pattern. Once this was determined I felt like that whole thing came together into something I thought suited her and that she would love. And she does! I presented the quilt to her at her studio about a month ago and to my delight her reaction was everything I had hoped.

Nomi’s Quilt.
All that was left was for me to pick out a piece for the trade to be complete and that turned out to be the most difficult part of the whole process. I just couldn’t decide! I finally picked my top three and she was gracious enough to bring all three to my apartment this week to try the paintings out in the space. It was pretty clear from the outset which was “the one” and I love it. There are many hours of getting to know “Spout” in my future and I can’t wait to see how this painting grows and changes for me.


And so ends the tale of one quilt, one painting, and two happy customers.

My first real encounter with a quilt was about 10 years ago when I was working as a medical photographer and happened to stop to admire a small exhibit of quilts on the walls leading to the hospital’s auditorium. I couldn’t figure out how the quilters were able to put on the edge (which I later discovered was called the binding) without any visible stitching! I decided that the easiest way to figure out a quilt was to make one and so headed down to a quilt shop that was relatively close to my apartment at the time. My plan was to go in at every step of the way, buying the new element of the quilt each time and asking questions as I went. It was a pretty good plan except that the store went out of business (or maybe moved) after my first trip and I was stuck with the little I had, which consisted of some piecing that I had painted with fabric paint. Five years and three moves later I still had the makings of a quilt in a plastic bag at the bottom of my closet and decided something had to be done about it. I asked around but no one was interested in finishing this project for me so I decided, finally, to take a beginner’s quilt class at Earthly Goods (www.earthlygoodsquilting.com) and made my first official quilt (in which I also learned how to put on a binding).

My first completed quilt! Easy as ABC “Hole in the Wall” beginner quilt class at Earthly Goods.
This was a machine pieced and quilted lap quilt and I tried my hand at a few quilts after, a wedding and a baby quilt, which is where my foray into quilting would have ended if I hadn’t decided to take another class on hand stitching. It changed my life and started me down the road of fabric hoarding and “just one more square before work” that I know most quilters would nod their heads in approval at. I still machine piece the top of every quilt I make, unless I’m english paper piecing of course, but no longer am I forever fighting with my machine as it sputters through three layers of quilt. Hand quilting, while I admit takes forever, is my favourite part of the process. Each stitch made while listening to music, a podcast, or a movie has let me enjoy the process of slowing down, being quiet and calm, and making something that I can really be proud of. And I’m hooked.
P.S. I did finally finish that first quilt last year and I decided to try something a little different and tie it with yarn instead of stitching it all together.

Hand painted and tied.
