Let The Great Rust Experiment Begin!

I decided the other day that I wanted to try dyeing fabric with rust so I sent my partner in crime out to the family acreage, always a good place to find rusty bits, on a very important mission to collect various rusted objects from the workshop. What came back to me was a myriad of flotsam and jetsam made up of washers, springs, hooks, and rings.

I still have a few cotton pieces from my last go at indigo dyeing, so I donated a piece from the stash for science. Using some of my precious creamy earl grey tea that I steeped for about 20 minutes in a large metal bowl, and while still warm, I soaked the fabric in it. Laying the fabric out in an aluminum-roasting pan I then proceeded to place the rusted pieces in a way that I thought would make a nice pattern, sprayed the whole thing with the leftover tea, now in a spray bottle, and covered with a plastic bag.

I let this sit for a few days, occasionally spraying it to make sure that everything was still wet, and when I couldn’t stand to wait any longer, removed the cotton piece for a look-see. I loved it!

Before and After

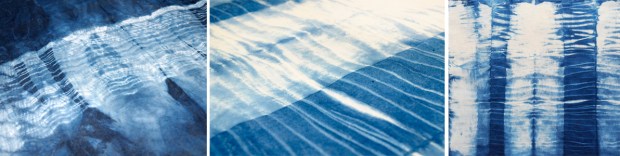
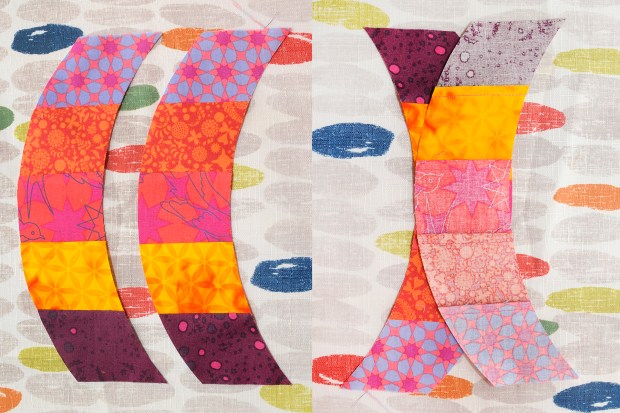
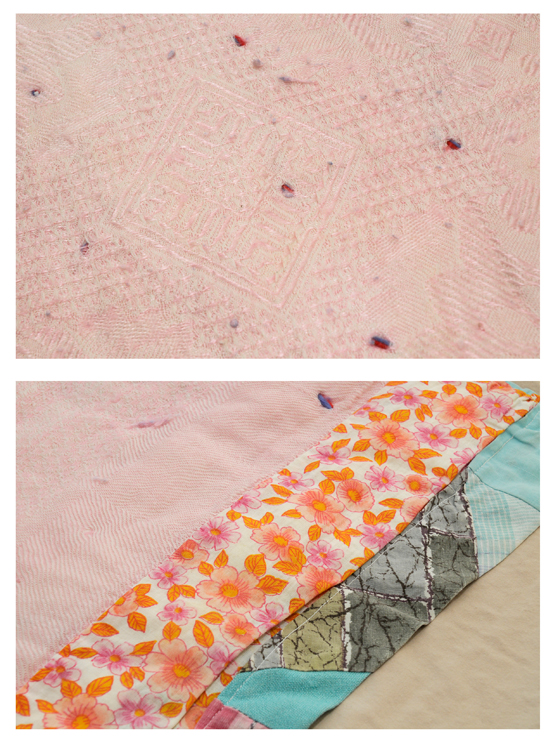
Before and After: On the left is the pre-washed and pre-ironed piece, probably still a bit wet. On the right is after rinsing with a gentle soap, left out to dry, and then ironed.

Because I wasn’t sure, and am still not, what I was going to do with it in the end I decided to give it a rinse with some gentle non toxic soap and, after drying, ironed it with trepidation (I am hoping I didn’t wreck the iron). I can definitely see how I lost detail and colour after rinsing but if I am going to eventually use this in a quilt I need it to be clean.

Rust Details

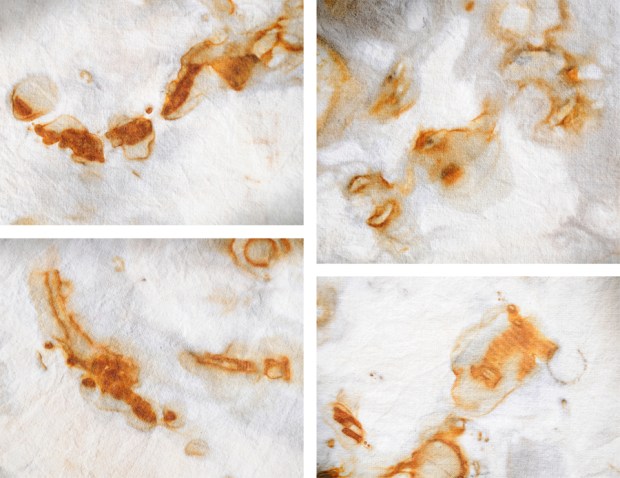
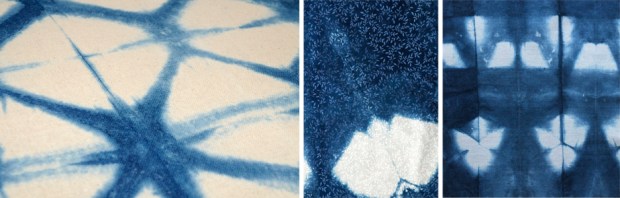
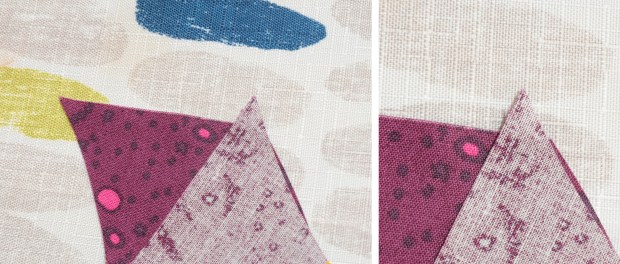
Details of some of the rust dyed elements on the fabric.

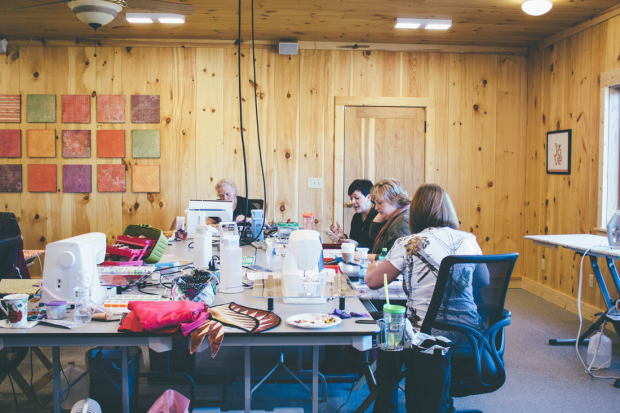
I really like this effect but I have so many questions! How much will this process, and the fact that there is still rust sitting on and in the fibre, continue to degrade the cotton piece? How will this affect other fabrics placed next to it? And how colourfast will this be over time? Fortunately I have a weekend workshop on natural dyeing at ACAD (Alberta College of Art & Design) coming up in a few weeks so I am hoping to pick my instructor’s brain and get a better idea of this process and best use of it for future projects!

Advertisement

An Unexpected Surprise

So I haven’t been very good at posting lately but I promise it’s not because I have been idle! I have a quilt that has been “In Progress” for years and I finally bit the bullet and said no more projects until this one is done. It’s been so hard! I have so many project ideas!

Needless to say, I have nothing really new to add as of late until it gets finished. Instead I am going to do a quick post on a crazy cool exhibit I saw in Toronto this summer at the Textile Museum of Canada (http://www.textilemuseum.ca/). The museum, right downtown and tucked into a little side street, is such an interesting little space, and easy to miss if you aren’t looking for it!

I was hoping to see some interesting quilts but what really blew my mind was the exhibit, “Huicholes: A People Walking Towards the Light, Wixarika Art by José Benítez Sánchez”. These yarn paintings were really so breathtaking, and quite large!

Kauymari, the Wind and the Word

Kauymari, the Wind and the Word by José Benítez Sánchez, 2005. The caption accompanying the piece reads “Tamatsi Kauyumari (Our Elder Brother, He Who Does Not Even Know His Name) is the god of the word as he is the one who taught the Huichol people to name things. At the centre of this yarn painting, we see Kauyumari in the form of the deer that taught the believers the language they hear at the sacred sites. According to Sánchez, before Kauyumari taught them language, ‘the entire world spoke badly.'” I think it’s so great how the various languages spilling out of the mouths is depicted!

These pieces are made by taking a piece of wooden board, covering it in a layer of beeswax, and then pressing yarn into the wax to make a highly detailed and colourful image. Other art pieces included very intricate beadwork, and such an exciting and remarkable texture is created when the beads cover an entire sculptural piece.

Tamatsi Kauyumari: Our Elder Brother, He Who Does Not Even Know His Name

Accompanying exhibit caption: “Tamatsi Kauyumari, also known as the Blue Deer, is the cultural hero of the Huichol. As he is an ambivalent being, he is associated with the morning and evening star.” This caption goes on to describe how Tamatsi Kauyumari was turned into a deer, and how pilgrims to the desert in a traditional yearly pilgrimage are able to interact with him through the consumption of peyote.

These pieces are filled with symbolism and imagery special to the Huicholes people and their culture and it was a pleasure to get a glimpse into their worldview.

For more information I bought a book in the gift shop that went with the exhibit “Yarn Paintings of the Huichol” by Hope Maclean.

Beaded Bowl

As captioned at the exhibit, “This artisanal bowl is made from a gourd. It was inspired by a ritual bowl.”

Quilt-ebago: Adventures in the Land of Summer

Whew! June was a very busy month for me, as I had picked up two extra contracts on top of my regular job, and by the time July came around I was in desperate need of a vacation. So I headed west to wine country and spent my days in the wineries (just tasting of course) and my nights in an air-conditioned hotel room watching HGTV. I had two missions for the trip, rent a paddleboard for a morning and get out on the lake, and get to a quilt shop.

I love my local quilt store and am very loyal to it but at my last class I came to a realization. As the woman teaching the class was showing us samples of work, I could see where I had that fabric, and that fabric over there, oh and I used that fabric in a baby quilt just last year. It dawned on me that everyone who shops at this store will all have similar fabric in one way or another in their quilts. I knew I needed to diversify. Stat.

I have a co-worker whose sister and her friends are very into quilting, they have even bought a longarm machine shared amongst them, and they recently travelled to the States for a big quilt conference that happens twice a year. They were sending back photos constantly during their trip, not only of the conference but of all of the quilt shops they stopped in along the way. This got me thinking again about quilt communities and building connections outside of my little world.

Mix

My new fabrics included floral, animal, and geometric patterns in a variety of colours.

I ended up stopping by Cherry Tree Quilts in Summerland and went a little nuts. I didn’t have anything specific in mind in terms of fabric or project, I just wanted to add some variety to my stash at home, so I just started working my way through the store and pulling fabrics that I was attracted to.

Geometrics Detail

Different geometric patterns to play with and get inspiration from.

I ended up getting a few fabrics cut in 1 metre lengths but most were in ½ metre bundles and while most will be secondary or supplementary fabrics, a few of these are definitely going to be the star of the show. I’ve broken them down into categories of pattern type-floral, animal, coloured gradients, and geometric-but these fabrics show a lot of potential inspiration for colour pairing with fabrics I already have or will challenge me to use a colour palette that I wouldn’t naturally gravitate to.

Colour Gradients Detail

Fun colour block fabrics that include gradients and gold squares.

While my regular quilt store is definitely still my number one go-to when it comes to fabric and classes, I am quite pleased with my new additions and I look forward to challenging myself to use these new fabrics instead of losing them to the abyss of the quilter’s stash.

Florals Detail 4

Florals!

Love At First Shibori

I’ve been taking classes at SNAP (The Society of Northern Alberta Print-artists http://www.snapartists.com) off and on for many years and when I saw the shibori workshop posted on their website I knew it was going to be a good one. Our instructor, Jolie Bird, did a wonderful job over two days of showing us different shibori techniques and the process of using indigo dye. Check out her work at her website http://joliebird.com/home.html.

Shibori is a Japanese term and the artisans who make these fabrics are masters at their craft. It is a resist dye technique and we learned about four types of approaches you can use to create different patterns on your fabric: pole-wrapping, folding and clamping, binding, and stitching.

After preparing the fabric, we soaked it in water before putting it into the dye bath. Because we used synthetic indigo dye we only needed to dip it into the bath 2 or 3 times, letting it oxidize for about 30 minutes between each dip. I made a friend in the workshop who had done a class before where they used natural indigo and found out that you would have to dip many more times to get the beautiful deep blue colour.

Shibori Process

Here you can see the indigo dye bath as well as my first piece before dyeing. We soaked our prepared pieces in water before dipping into the dye bath. The fabric looks green when it first comes out but quickly oxidizes and turns a dark blue.

Pole-wrapping meant that you would pleat your fabric and then wrap it around a cylinder. We used plastic pipes of varying sizes wrapped with threaded cables to get a linear effect and I really liked experimenting with both plastic pipes and thick rope as a core.

Shibori Samples

A few of my samples using the pole-wrapping technique. The image on the far left is from the image above where I wrapped a threaded cable around a thick rope core.

Folding and clamping also began with pleating and then folding the fabric into a square or triangle shape and clamping with either square or triangular wooden blocks. I quickly began experimenting with different ways to fold and clamp and had so much fun with this technique.

Shibori Samples

Experimenting with different folding and clamping methods.

Making circular elements involved pulling up sections of the fabric and binding them with thread. Depending on how you wrapped the thread around the section of fabric you could get rings or shell/spider web type shapes. You could also use thread to stitch designs into the fabric. We used running stitch or whipstitch to get different marks. I felt like the running stitch looked like x-rayed teeth and the whipstitch was supposed to be reminiscent of leaves.

Shibori samples

Here you can see how the running stitch looks after the fabric has been dyed and how various binding techniques create rings and “spider webs”.

It was so much fun and I loved that you never knew what you were going to get when you washed out the final piece. Every time it was a surprise and every time it was magnificent.

Shibori Samples

Double Header

So many babies lately! I had two baby quilts I needed to have completed for the beginning of the New Year and thankfully I got both done in time to welcome the babies home. In order to save time I used the same design for both, allowing me to use pieces to mix and match between the two quilts. I chose a simple star pattern that consisted of large squares and triangles and quickly got under way.

Quilt for Baby Ellie

Baby quilts are great for getting to use fun colours and patterns.

This first quilt I made for a good friend of mine but I had no idea if the baby was going to be a boy or a girl. They live on the west coast so I deemed an ocean theme appropriate, plus that meant cute ocean creatures! I also had a huge amount of blue and white wave patterned fabric from a previous project that I never used so getting rid of fabric from the stash is a super bonus.

Baby Quilt for Ellie

I decided to be a bit playful and turn one of the squares in the middle so that it didn’t line up with the others and once I had tried it I just couldn’t go back!

After completing the piecing for the top I hand stitched straight lines throughout, using the geometric shapes as my guide. I’m always looking for ideas for stitch patterns that will save me time on stencilling a design out. Plus this means I don’t have any pencil lines at the end that never seem to want to wash or erase completely out. I love how this came out but didn’t realize how the lines would affect the pattern on the fabric, making it move more into the background. Every time I do a quilt I learn something new!

Quilt for Baby Ellie

Ocean creatures in the corners added an extra surprise to this quilt.

I decided to add a fun little artistic element to the corners and drew, then stitched, little ocean creatures onto the white squares. It may be a little hard to see but each corner had it’s own little image – whale, starfish, crab, and jellyfish. Happily this seemed to jump out at people right away when they saw the quilt and I really enjoyed trying my hand at freehand drawn stitching.

Quilt for Baby Leighton

A bright addition to a dreary March day.

The second quilt was for my brother and sister-in-law’s new baby and this time I knew it was going to be a girl. Using some of the same cut out pieces from the first quilt, again I was able to dip into my stash to pick out some different patterns and colours for the top piece to make something specific and unique to the new baby. Because I made the second quilt a bit smaller I had to bulk it up with borders to increase the size and really like how the star gets framed.

Baby Quilt for Leighton

This time I used flannel for the backing to make it soft but I would say it was a bit of a struggle to hand stitch. I stencilled in pencil some small flowers all over the back so stitched with my 14” hoop from the back. Maybe it was not the best idea to do it from the back or maybe it was because of the two different types of fabric but I felt like it was hard to get the front to stay nice and tight in the hoop, while the back seemed fine. I also struggled a bit with the flower pattern as I think it was a bit small for this project and I spaced them too far apart. For hand stitching I use a wool batting and it is recommended that the spacing between stitches should not be more than 3” or 4”. I did think about adding some stars to fill in the gaps but when getting others’ opinions it seemed they thought just having the flowers was fine. I could have also added some ties in between to fill in the space which would have added a nice texture and dimension to the quilt. Time will tell how this quilt wears.

I really like how these two quilts have their own individual and separate feel even though they were made at the same time, with some of the same fabrics, and using the same large star pattern in the middle.

Learning Curve

The other day I got an email from the quilt shop and decided at the last minute to take another class that was being run on the weekend. Titled “Metro Hoops/Metro Rings”, I thought it would be a great opportunity to finally learn how to sew a curved edge!

Prior to the class you had to choose which pattern you were going to make and with six of us attending we all coincidentally decided to do metro rings. We also had to buy a specific ruler that went with the pattern, a bit pricey, but worked great for these patterns (to be fair the ruler comes with an included pattern). The Quick Curve Ruler and Metro Ring pattern comes from Sew Kind of Wonderful, a company from the States started by three sisters (see http://www.sewkindofwonderful.com for more information).

Metro Rings Class Preparation2.jpg

Quick Curve Ruler and Metro Rings Class Fabric Prep.

Both patterns require 2 1/2” strips and I had planned on using scraps from my stash to learn how to create the block. Because I wasn’t sure how this pattern would work I did end up buying some new fabric but as I worked on the block throughout the day I really believe that this would be a great way to use up some scraps. All you need are strips of fabric at the minimum of about 7” – 10” in length, depending on how you want to develop the pattern for your project. The height of the ruler is 7” but you will need to include room to square up before you can make your first curved set. That first bit of waste is about 2 1/2”, leaving you room to make the 2 1/2” curve set. Having strips at about 10″ will let you make two sets but if you were doing a larger project and wanted to save waste you would use longer pieces to make multiple sets. The pattern suggests 20” strips which should give you about 7 identical strip sets. The longer the strips the less waste you have but more sets of identical strips.

Sewing the curve turned out to be pretty easy! Don’t be daunted by the awkwardness of how it sits while you are sewing and just focus on the fabric in front of the foot, making sure that just that bit lines up. Like magic it just ends up working out! My teacher suggested sewing the curved edge with the two sides of the fabric together and oriented so that the fabric on top makes a “C” shape.

metro-rings-sewing-a-curve3

Put the two pieces together so that the top piece forms a “C” shape. You wouldn’t sew these two pieces together but this is a good example of the shape I am trying to describe.

We learned about overlapping the edge to start, meaning that you want to leave about a quarter of an inch of overlap on the top fabric to account for starting the stitch on both fabrics at once. We did not use any pins but just manipulated the fabric by hand as it went through the foot. So easy and I got a great smooth curve every time.

metro-rings-sewing-a-curve2

Overlap the edge on top at the same width that you are sewing your seam (1/4″). You would begin sewing at the spot on the left where the two pieces meet. I didn’t line them up exactly so that you could see how the bottom was sitting compared to the top but normally you would match the curved edges of the two pieces together.

It was really interesting to see how other people in the class were using their fabrics and I thought all of the different blocks were so interesting. This is a really versatile block and I think that mixing and matching from scraps and different fabrics would make a really exciting quilt every time.

metro-rings-class2

Finishing up the first block in class with a second on the go behind.

metro-rings-class4

Block samples from my classmates and I with finished samples of the metro rings and metro hoop pattern on either side.

As I already have a lot of quilt projects on the go, originally I was going to make a table runner by using three of the blocks. I ended up only making two as I couldn’t decide if I wanted to make these into pillows instead or maybe some place mats. The problem is that the blocks are so beautiful that I don’t want them getting dirty with messy eaters! Time will tell what I decide to do but for now I am going to let them sit until I get some other projects finished.

metro-rings-final-squares

Two finished 4-block units placed side by side.

I have another class coming up in April through SNAP where I will learn a Japanese dyeing technique called Arimatsu Shibori. I can’t wait to try my hand at dyeing fabric for a quilt!

What Lies Beneath

tofino-landscape-1

Tofino, British Columbia

A few years ago I took a road trip with the final destination being Tofino, BC. Tofino is a beautiful small surf town on the west coast of Vancouver Island surrounded by ocean and rainforest. While in one of the shops I bought some little round shell buttons and decided that I wanted to incorporate them into a quilt that commemorated the trip and the landscape.

Apart from hanging out around town, we also surfed, hiked, and tried our hand at paddle boarding. Paddle boarding is an amazing experience; to float on the surface and look down into the water and see little fish, coral, urchins, and starfish was definitely an inspiration for this quilt. I also wanted to incorporate the landscape. It rained quite a bit when I was there and you would get these huge expanses of grey sky and grey ocean, which intensified the surprise pops of colour found under the water.

tofino-landscape-2

A grey day in Tofino.

ucluelet-undersea-photos

West coast marine life.

Originally I had planned to make a full sized quilt but I have quite a collection around here now so decided to do a wall hanging instead (33″ x 38″). My plan was to sew the fabrics I’d picked into a geometric pattern with no real tangible link to the real world. Something about that idea wasn’t grabbing me though and I was having trouble committing to it and begin cutting. It wasn’t until I took some time and rethought about what I was trying to achieve that I began to form a picture of what the quilt would finally become. This happens to me quite a lot and this process can mean that the idea either ruminates in my mind for days or weeks, or in the case of a quilt still to come—years, or result in me sketching out multiple ideas until I am satisfied. Even then a quilt will evolve as I go, as in the case of “A Painting for a Quilt”.

tofino2

Tofino inspired quilt.

In the end I came up with something more recognizable to reality but still abstract enough that I could shape the movement and reflection of the water, and the brilliant colours underneath it, amongst the stillness of a grey day. The design also allowed me to incorporate the shell buttons, giving them a defined sense of place. The buttons embody the ubiquitous nature of sand on the ocean floor and the makings of a beach but also as representations of shelled ocean creatures.

To hang the quilt I used a method similar to what I saw being done at the museum when hanging textiles and used two small loops of fabric sewn to the back top of the quilt a few inches in on either side. I made sure that the loops where big enough for the wooden slat I was using and slid the slat through the loops, screwing the edges of the wood into the wall. I do notice a bit of a difference between the top and the bottom in how it hangs as the top of the quilt is stabilized and lays flat against the wood while the bottom is more free to hang and tapers a bit towards the bottom. I guess if I really wanted to keep everything flat I could have added a slat to the bottom as well. I’m not sure how this will affect the longevity of the quilt over time so I will have to ask a few of my conservator friends their opinion on the matter!

It Takes A Village: Quilt Communities

Lately I’ve been feeling a bit dissatisfied with my “laziness” when it comes to the technical aspects of quilt production and so decided to take a class through my local quilt shop, Earthly Goods, in hopes it would get me back on track. The class, titled “Rotary Cutting Basics + More”, is a beginner class teaching burgeoning quilters the basics of measuring, cutting, and making the perfect ¼” seam. My teacher was bit surprised to see me but I really felt like this was the perfect time for a review. I got so much out of the class and it’s really gotten me thinking about the social aspect of quilters and the communities they build.

In the first ten minutes of the class I had felt I had already gotten my money’s worth as it became quite clear that my rotary cutter was severely lacking in it’s effectiveness…I was missing a piece and my blade was on the wrong side! How embarrassing. 🙂 I’m not sure how this happened but both problems must have stemmed from the very first time I tried to change a blade. The piece missing was a large yellow washer resulting in my blade being loose and wobbly. I had also switched the side of the blade on the cutter so that I was using it as a left-handed quilter would, which I am not. No wonder I wasn’t happy with my cutting! We also learned how to use and care for our cutting mats and rulers. And I finally figured out how to use all of the diagonal lines on my Omnigrid.

Having quilted for a few years now I also came to the class equipped with questions about continuing issues with my sewing machine, something I would not have been prepared with if I was a beginner quilter.

timberhaze-retreat

Try taking a class or going on a retreat! Image taken from the Timberhaze Retreat Website. http://timberhazeretreat.com/quilting-retreat/

As a solitary quilter, this class has really gotten me thinking about the benefits of taking an active part in quilt culture. Check out your local quilt store and find out the local guilds in your area. A quick Google search will show you a whole world of quilt retreats and vacations (quilt cruise!) and don’t forget to keep your eyes peeled for any exhibits and shows that might be in the works.

saqa-2016-conference

Image from the SAQA 2016 Conference. Image taken from http://craftindustryalliance.org/saqa-conference-report/

A Study In Twins

My friends announced in February that they were pregnant with twin girls and I knew I had to get going on some quilts if they were to be ready for the babies’ arrival in August. I jumped at the chance to do a little experiment that has been on my mind lately…to play with two different patterns but using the same fabrics in both.

I knew I wanted to use traditional block patterns but with bright contemporary fabric colours and prints so I decided to create one quilt using a churn and dash block and the other with a variable star block pattern.

TwinsQuilt8

Churn and Dash Block, Variable Star Block

Both blocks contain a central square in the middle and triangles that frame the corners, but each retains its own distinct look. For the star block I decided to randomly sew the triangles onto the square without any thought for colour coordinated combinations. Alternatively I decided that to do the same for the churn and dash would make it too chaotic for the eye to follow the underlying pattern. Instead, while I did randomly choose what fabric I was going to use for each individual block, the triangles were always consistently the same, giving me the freedom to make the rectangular frames act as the random element in the block. The white pieces of the quilt came from two different fabrics and they were also constructed without any thought to how they sat next to each other throughout the quilts.

TwinsQuilt14

Two central squares using the same fabric, showcasing how these blocks mirror each other while still staying distinct to their own block patterns.

I really wanted to see how two different patterns using the same fabrics would compare to each other and I found that in many ways the quilts were able to mirror each other as a set but still have a distinct enough difference that the twins were not getting the same quilt.

A surprising element when constructing these quilts manifested itself in the various fabrics I used. I chose a lot of fabrics with the same colour elements in them but without foresight to how they would stand out within the blocks, especially when observed from a distance. Two of my fabrics were very subtle in that the pinks and blues were quite light and delicate and seemed to get lost against the very active nature of the other fabrics. In the image below, note how these fabrics get lost in the overall pattern, specifically where some of the triangles seem to be missing. I quite like this in that it adds movement and action, especially in the variable star pattern – almost as if the stars were twinkling, but this effect was purely accidental. Happy accidents!

TwinsQuilt11

The two quilts side by side.

I am happy with how these turned out and it was a lot of fun to work with fabrics that were playful and bright and with block patterns that I have wanted to try for ages. Hopefully the girls will like them too!

TwinsQuilt36

History in a Quilt


Gullena Block Quilt web 4

Family Heirloom Quilt, Front and Back View

A few years ago I was given an amazing family heirloom quilt but it wasn’t until this year that I really came to know the story behind it. The 48″ x 60″ quilt is tied with red and purple yarn and is made up of strips in the middle and a row of quarter square triangles running vertically along the sides. It is finished with a beautiful blue border that also runs along the sides, leaving an interesting edge along the top and bottom without it feeling incomplete or undeveloped. The back has a few strips of the fabric from the front in what I assume is a type of sashing to reinforce and strengthen the edge and that to me indicates the top of the quilt. This is an element that I seem to see quite a lot in older quilts and as far as I know has not really carried over into more modern style quilting. The back is made from a piece of bedcover and has a marvellous textured design throughout.

Gullena Block Quilt web 3

Quilt back showcasing the texture of the cloth and the sashing that runs along the top.

The front is made from 16 different solids, varying from light and dark blue to pinks, yellows, white, greens, oranges, and reds. Patterns abound here with plaids, florals, stripes, fruit, checkered squares, etc. to create a vibrant but balanced composition and a magnificent piece of art.

Gullena Block Quilt web

A sampling of the types of fabric used in this quilt.

The quilt is quite fragile so I have kept it stored away to try and protect it from further damage. I had it out to air and to take some photographs when I decided to send the pictures to my aunt, hoping she would have an idea of the quilt’s history.

Originally I had thought that it was made by my grandmother, who died in her thirties so I never had the chance to meet her, but my aunt informed me that it was actually my great grandmother who was the quilter. Gullena Block, born on April 8, 1905, lived most of her life in Estevan, Saskatchewan and made a quilt for each of her grandchildren as wedding gifts. In true patchwork fashion the quilts were made from leftover scraps of fabric she had from curtains and dresses, etc.

Great Grandma and Grandpa Block Sept 1956 web

Great Grandma and Grandpa Block, September 1956

I am only just starting to get to know the history of this side of my family and I have a lot more digging to do; all it took was a simple question about a quilt to get the ball rolling.