

I’ve been taking classes at SNAP (The Society of Northern Alberta Print-artists http://www.snapartists.com) off and on for many years and when I saw the shibori workshop posted on their website I knew it was going to be a good one. Our instructor, Jolie Bird, did a wonderful job over two days of showing us different shibori techniques and the process of using indigo dye. Check out her work at her website http://joliebird.com/home.html.
Shibori is a Japanese term and the artisans who make these fabrics are masters at their craft. It is a resist dye technique and we learned about four types of approaches you can use to create different patterns on your fabric: pole-wrapping, folding and clamping, binding, and stitching.
After preparing the fabric, we soaked it in water before putting it into the dye bath. Because we used synthetic indigo dye we only needed to dip it into the bath 2 or 3 times, letting it oxidize for about 30 minutes between each dip. I made a friend in the workshop who had done a class before where they used natural indigo and found out that you would have to dip many more times to get the beautiful deep blue colour.

Here you can see the indigo dye bath as well as my first piece before dyeing. We soaked our prepared pieces in water before dipping into the dye bath. The fabric looks green when it first comes out but quickly oxidizes and turns a dark blue.
Pole-wrapping meant that you would pleat your fabric and then wrap it around a cylinder. We used plastic pipes of varying sizes wrapped with threaded cables to get a linear effect and I really liked experimenting with both plastic pipes and thick rope as a core.
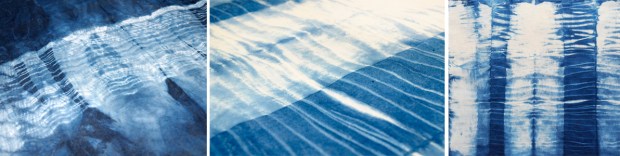
A few of my samples using the pole-wrapping technique. The image on the far left is from the image above where I wrapped a threaded cable around a thick rope core.
Folding and clamping also began with pleating and then folding the fabric into a square or triangle shape and clamping with either square or triangular wooden blocks. I quickly began experimenting with different ways to fold and clamp and had so much fun with this technique.
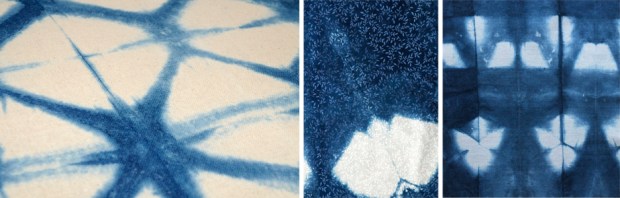
Experimenting with different folding and clamping methods.
Making circular elements involved pulling up sections of the fabric and binding them with thread. Depending on how you wrapped the thread around the section of fabric you could get rings or shell/spider web type shapes. You could also use thread to stitch designs into the fabric. We used running stitch or whipstitch to get different marks. I felt like the running stitch looked like x-rayed teeth and the whipstitch was supposed to be reminiscent of leaves.
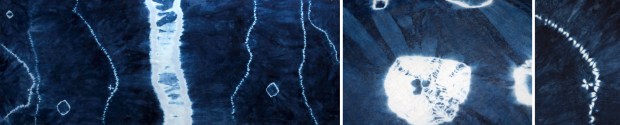
Here you can see how the running stitch looks after the fabric has been dyed and how various binding techniques create rings and “spider webs”.
It was so much fun and I loved that you never knew what you were going to get when you washed out the final piece. Every time it was a surprise and every time it was magnificent.

