What A Beautiful Day For A Dye

I taught a workshop!

A few people I know have been asking me to show them how to do some dyeing, so I finally picked a day and did it. There were six of us in all (me included) and we did it in my backyard on what couldn’t have been a nicer day. I decided to do a shibori and indigo dye class, which was so easy because I already had all of the supplies from my own dyeing experiments ready to go.

We went from about 10:30 am to 3:30 pm with a lunch break in the middle, although once people got in the groove it was hard to get them to stop and eat!

I taught everyone four different techniques and then left them to it, being there to help along the way. It was so cool to see what everyone did and the final results were all fantastic. The general feedback is that they are all hooked and can’t wait to do it again and I feel exactly the same way!

There have been a few occasions in the past couple years when I have been asked to come teach a class or workshop, either it be dyeing or hand stitching and quilting, but things never seem to work out timing-wise. So I decided to take matters into my own hands and start running some workshops on my own, getting some practice in so I can be ready for the next request. These lovely people were great guinea pigs and I am so excited to get out there and do it again!


Advertisement

Nuts, Beetles, and Buds

As is evident on the blog lately, I have become increasingly interested in making my own one of a kind fabric to use in my quilts. Ergo, dyeing it myself! As a kid I always wanted to be the person who knew everything about plants for the inevitable moment when I would need to survive on my own in the wild (Note: I am definitely not that sort of person, I would die so quick). But through dyeing I have found a different way to interact with the natural world. This has opened up a new creative approach for me – as a dye scientist!

After the indigo shibori dyeing class in the spring I have taken out a few books on dyeing from the library, specifically natural dyeing. But none of it made any sense to me, it was so overwhelming to read about chemicals, and pH, and percentages, and scientific names. In university I had taken a textile class where we learned about different dyes and dye techniques around the world, which has been super helpful as I’ve explored more of the textile world, but I was a bit cloudy about how to go about doing it myself in my own back yard.

So I decided to take another class! This time I had to drive three hours south for a weekend workshop at ACAD (Alberta College of Art and Design), another dream in itself: to get to pretend to be an ACAD student for a weekend – Yay! Seathra Bell was our instructor and with just four of us as students it was a perfect class size to learn and experiment in. Check out Seathra’s work here: http://www.seathrabell.com or on instagram: http://www.instagram.com/seathrabell/. Her stuff is so beautiful, and she has such a passion for textiles and natural dyeing – simply amazing!

First we learned about scouring the fibres, yarns, and fabrics, which can be a different process depending on if what you are dyeing is protein (eg. wool, silk, etc.) or cellulose based (cotton, bamboo, etc.). The protein samples we treated with orvus and the cellulose with soda ash and synthrapol. This cleans and prepares the fabric for dyeing. Next up was the mordant. This allows the dye to adhere and fix to the fibres. There are many different mordants available and what you use will depend on the material you are dyeing with and the dye you are using. This is where experimentation or knowledge from other dyers comes in to play. For our class, we used alum (proteins) and an alum/tannic acid mix (cellulose).

Scouring the Proteins and Cellulose

Scouring the proteins and cellulose. Mordanting looks exactly the same. 🙂

Next we prepared the dye baths. Seathra brought in four different natural dye products for us to try: onion skins, marigold heads, cochineal insects, and walnut husks. I was a bit sad about the cochineals but when I saw how little we needed to use to make our dye bath I felt better about it.

Dye Materials

The dye materials: onion skins, cochineals, marigolds, and walnut husks.

Basically we put these in separate pots with water and simmered for about an hour to an hour and a half. Then we let it sit overnight. Scouring, mordanting, and preparing the dye bath isn’t hard but is a long process and was what we did on the first day alone – no dyeing yet!

*I should also note here that everything used in this process—pots, spoons, etc. is designated for dyeing only, do not use to cook food as well!

Dye Bath

Getting the dye baths ready.

Now to the dyeing! At this point, regardless of protein or cellulose based origins, everything went into the pot and then it was just a matter of watching the pot at a simmer and stirring to ensure even contact with the dye. Some dye materials are more fragile than others (marigolds vs. walnut husks) but a good way to go about it, I think, is to treat everything like it’s fragile and keep it hot at a simmer, adjusting the temperature if you need to so that it doesn’t start to boil. We dyed everything for about an hour, hour and a half before removing the fibres, yarns, and fabrics from the bath and then rinsed with warm to progressively colder water until they ran clear and hung to dry. This timing is the usual saturation point for dyeing but if the dye bath was closer to being exhausted and you wanted to try to get as much out of it as possible, you could let the material sit in the bath overnight.

Dyeing

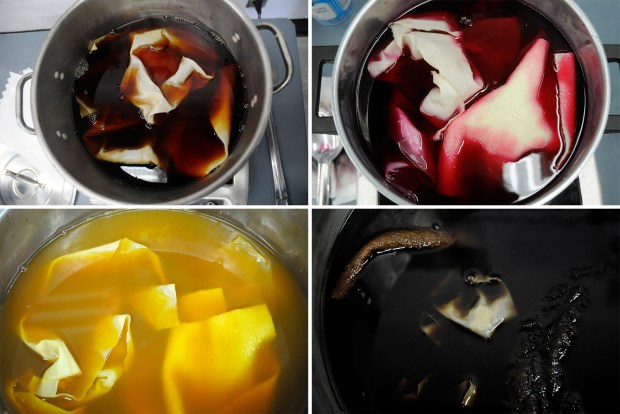
Putting the fabric into the dye baths: onion, cochineal, marigold, walnut.

Dyeing Bath

The colour saturates and the fibre gets darker: onion and cochineal.

Seathra made sure we had a good sample of fabrics and fibres, everything from mureno, wool, and silk to cotton and bamboo, so that we could experience how the dye affects each one. You can definitely see the huge range and variety of shades that can be achieved!

Hanging to dry

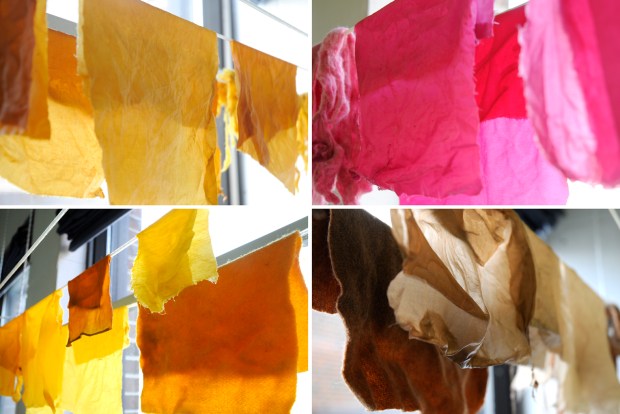
Hanging everything to dry: onion, cochineal, marigold, walnut.

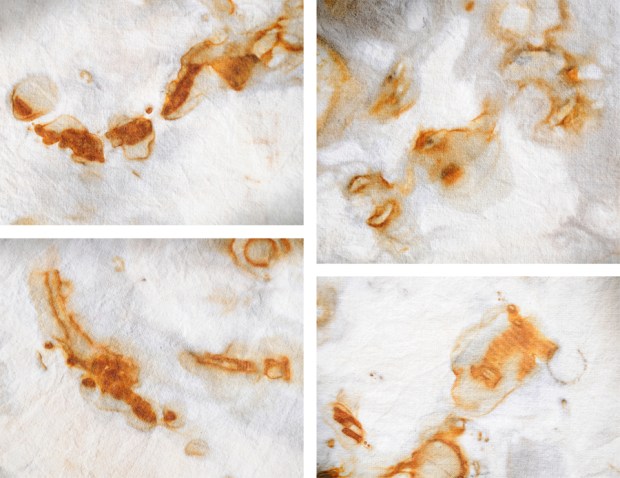
One last thing, you can change colour by overdyeing, either with another colour or with a rust, copper, or vinegar solution. We had both rust and vinegar to try and from my and the other students’ experiments it seemed that the rust produced a change more often than the vinegar (and we all know how much I like rust!). We did try adding vinegar to the pot for the last dip in the cochineal dye bath and it was quite apparent how the tone of the colour changed from a more mauve-purple to a fresh, clean pink. What I learned most this weekend was that experimentation is key and I would definitely like to try a copper overdye in the future.

Finished dyed samples

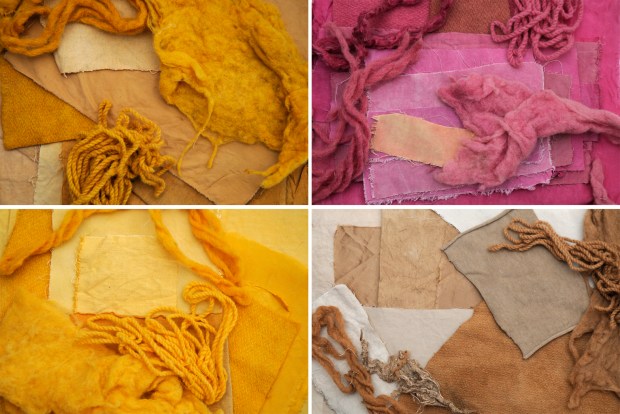
Finished dye samples. Here you can see the variation in colour depending on what textile is being used: onion, cochineal, marigold, and walnut.

I came away from this class with a huge appreciation for natural colours and in amazement of what can be achieved from humble kitchen scraps and plants found in one’s own backyard. I already have plans for what to try next!

Let The Great Rust Experiment Begin!

I decided the other day that I wanted to try dyeing fabric with rust so I sent my partner in crime out to the family acreage, always a good place to find rusty bits, on a very important mission to collect various rusted objects from the workshop. What came back to me was a myriad of flotsam and jetsam made up of washers, springs, hooks, and rings.

I still have a few cotton pieces from my last go at indigo dyeing, so I donated a piece from the stash for science. Using some of my precious creamy earl grey tea that I steeped for about 20 minutes in a large metal bowl, and while still warm, I soaked the fabric in it. Laying the fabric out in an aluminum-roasting pan I then proceeded to place the rusted pieces in a way that I thought would make a nice pattern, sprayed the whole thing with the leftover tea, now in a spray bottle, and covered with a plastic bag.

I let this sit for a few days, occasionally spraying it to make sure that everything was still wet, and when I couldn’t stand to wait any longer, removed the cotton piece for a look-see. I loved it!

Before and After

Before and After: On the left is the pre-washed and pre-ironed piece, probably still a bit wet. On the right is after rinsing with a gentle soap, left out to dry, and then ironed.

Because I wasn’t sure, and am still not, what I was going to do with it in the end I decided to give it a rinse with some gentle non toxic soap and, after drying, ironed it with trepidation (I am hoping I didn’t wreck the iron). I can definitely see how I lost detail and colour after rinsing but if I am going to eventually use this in a quilt I need it to be clean.

Rust Details

Details of some of the rust dyed elements on the fabric.

I really like this effect but I have so many questions! How much will this process, and the fact that there is still rust sitting on and in the fibre, continue to degrade the cotton piece? How will this affect other fabrics placed next to it? And how colourfast will this be over time? Fortunately I have a weekend workshop on natural dyeing at ACAD (Alberta College of Art & Design) coming up in a few weeks so I am hoping to pick my instructor’s brain and get a better idea of this process and best use of it for future projects!

Love At First Shibori

I’ve been taking classes at SNAP (The Society of Northern Alberta Print-artists http://www.snapartists.com) off and on for many years and when I saw the shibori workshop posted on their website I knew it was going to be a good one. Our instructor, Jolie Bird, did a wonderful job over two days of showing us different shibori techniques and the process of using indigo dye. Check out her work at her website http://joliebird.com/home.html.

Shibori is a Japanese term and the artisans who make these fabrics are masters at their craft. It is a resist dye technique and we learned about four types of approaches you can use to create different patterns on your fabric: pole-wrapping, folding and clamping, binding, and stitching.

After preparing the fabric, we soaked it in water before putting it into the dye bath. Because we used synthetic indigo dye we only needed to dip it into the bath 2 or 3 times, letting it oxidize for about 30 minutes between each dip. I made a friend in the workshop who had done a class before where they used natural indigo and found out that you would have to dip many more times to get the beautiful deep blue colour.

Shibori Process

Here you can see the indigo dye bath as well as my first piece before dyeing. We soaked our prepared pieces in water before dipping into the dye bath. The fabric looks green when it first comes out but quickly oxidizes and turns a dark blue.

Pole-wrapping meant that you would pleat your fabric and then wrap it around a cylinder. We used plastic pipes of varying sizes wrapped with threaded cables to get a linear effect and I really liked experimenting with both plastic pipes and thick rope as a core.

Shibori Samples

A few of my samples using the pole-wrapping technique. The image on the far left is from the image above where I wrapped a threaded cable around a thick rope core.

Folding and clamping also began with pleating and then folding the fabric into a square or triangle shape and clamping with either square or triangular wooden blocks. I quickly began experimenting with different ways to fold and clamp and had so much fun with this technique.

Shibori Samples

Experimenting with different folding and clamping methods.

Making circular elements involved pulling up sections of the fabric and binding them with thread. Depending on how you wrapped the thread around the section of fabric you could get rings or shell/spider web type shapes. You could also use thread to stitch designs into the fabric. We used running stitch or whipstitch to get different marks. I felt like the running stitch looked like x-rayed teeth and the whipstitch was supposed to be reminiscent of leaves.

Shibori samples

Here you can see how the running stitch looks after the fabric has been dyed and how various binding techniques create rings and “spider webs”.

It was so much fun and I loved that you never knew what you were going to get when you washed out the final piece. Every time it was a surprise and every time it was magnificent.

Shibori Samples